Table of Contents
Introduction
In today's interconnected world, remote access to devices has become essential for both personal and professional use. One of the most popular tools for remote access is RemoteIoT, especially when paired with a Raspberry Pi. This combination allows users to securely access their devices from anywhere in the world, even when they are behind a router. RemoteIoT behind router Raspberry Pi free solutions are particularly appealing due to their cost-effectiveness and ease of setup.
RemoteIoT is a platform designed to simplify remote device management. It provides users with a secure and reliable way to connect to their devices without the need for complex configurations. The Raspberry Pi, on the other hand, is a versatile single-board computer that has gained immense popularity for its affordability and flexibility. Together, they form a powerful solution for remote access.
This article will delve into the intricacies of setting up RemoteIoT behind a router with a Raspberry Pi. We will explore the benefits, provide a step-by-step guide, and offer troubleshooting tips to ensure a smooth experience. Whether you are a hobbyist, a developer, or an IT professional, this guide will equip you with the knowledge to implement a secure and efficient remote access solution.
What is RemoteIoT?
RemoteIoT is a cloud-based platform that enables users to remotely access and manage their IoT devices securely. It eliminates the need for complex network configurations, such as port forwarding, by providing a direct connection between the user and the device. This makes it an ideal solution for individuals and businesses looking to simplify remote access.
The platform supports a wide range of devices, including the Raspberry Pi, and offers features such as secure tunneling, device monitoring, and remote control. RemoteIoT ensures that your data remains encrypted and protected, adhering to industry standards for security and privacy.
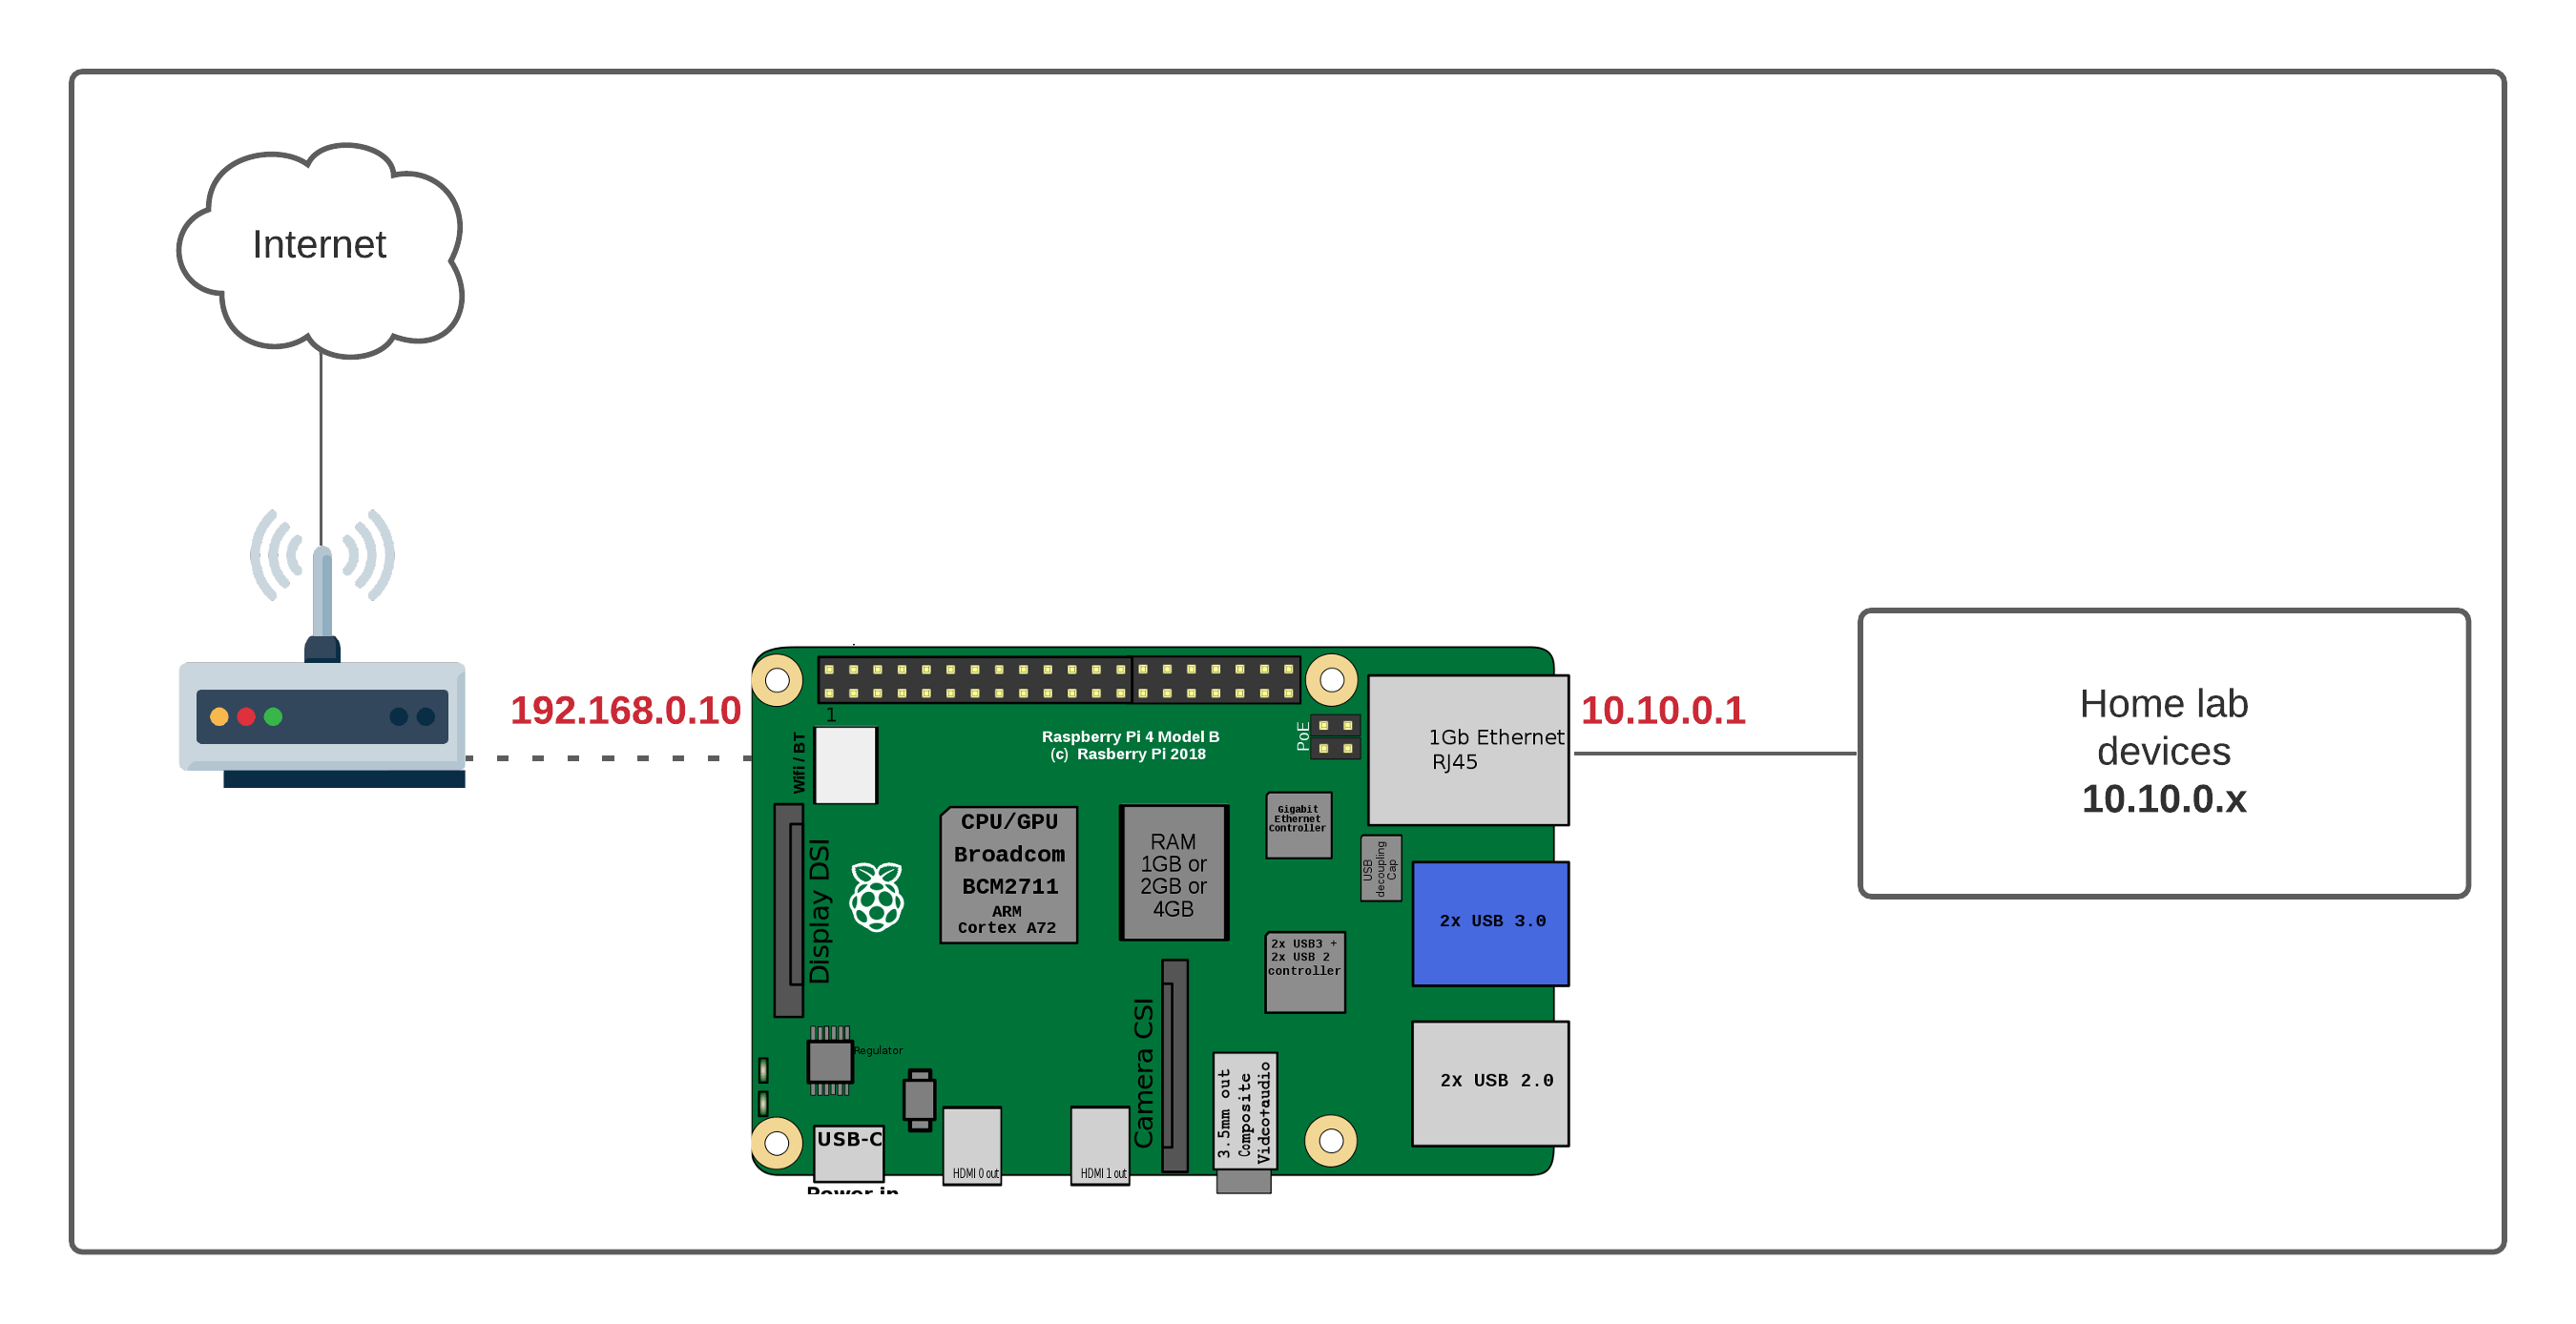
One of the standout features of RemoteIoT is its ability to work seamlessly behind routers. This is particularly useful for users who do not have control over their network settings or who want to avoid exposing their devices to the public internet. By leveraging RemoteIoT, users can achieve secure remote access without compromising their network security.
Raspberry Pi Overview
The Raspberry Pi is a credit-card-sized computer that has revolutionized the world of DIY electronics and IoT projects. Developed by the Raspberry Pi Foundation, it is designed to be affordable, versatile, and accessible to users of all skill levels. Whether you are building a home automation system, a media center, or a remote server, the Raspberry Pi can handle it all.
Here is a quick overview of the Raspberry Pi's key specifications:
| Feature | Details |
|---|---|
| Processor | Quad-core ARM Cortex-A72 (up to 1.8GHz) |
| Memory | 2GB, 4GB, or 8GB LPDDR4 |
| Connectivity | Wi-Fi, Bluetooth, Ethernet |
| Operating System | Raspberry Pi OS, Ubuntu, and more |
| Ports | USB, HDMI, GPIO |
With its compact size and powerful capabilities, the Raspberry Pi is an excellent choice for remote access projects. Its compatibility with platforms like RemoteIoT makes it even more appealing for users seeking a reliable and cost-effective solution.
Why Use RemoteIoT with Raspberry Pi?
Combining RemoteIoT with a Raspberry Pi offers numerous advantages, making it a popular choice for remote access solutions. Below are some of the key reasons why this pairing is so effective:
- Cost-Effective: Both RemoteIoT and Raspberry Pi are budget-friendly options, making them ideal for individuals and small businesses.
- Easy Setup: RemoteIoT simplifies the process of connecting to your Raspberry Pi, even when it is behind a router.
- Secure Access: RemoteIoT ensures that your connection is encrypted and secure, protecting your data from unauthorized access.
- Versatility: The Raspberry Pi's flexibility allows it to be used in a wide range of applications, from home automation to industrial IoT.
- Remote Management: With RemoteIoT, you can monitor and control your Raspberry Pi from anywhere, providing convenience and efficiency.
These benefits make RemoteIoT and Raspberry Pi a powerful combination for anyone looking to implement a remote access solution.
Setting Up RemoteIoT Behind a Router
One of the challenges of remote access is dealing with routers and firewalls. Many users struggle with port forwarding or exposing their devices to the public internet, which can pose security risks. RemoteIoT addresses these issues by providing a seamless way to connect to your Raspberry Pi without requiring complex configurations.
When setting up RemoteIoT behind a router, the platform uses secure tunneling to establish a connection. This means that your Raspberry Pi does not need to be directly exposed to the internet, reducing the risk of unauthorized access. Instead, RemoteIoT creates a secure pathway between your device and the platform, allowing you to access it remotely.
In the next section, we will provide a step-by-step guide to configuring RemoteIoT with your Raspberry Pi.
Step-by-Step Guide to Configure RemoteIoT
Configuring RemoteIoT with your Raspberry Pi is a straightforward process. Follow the steps below to set up secure remote access:
Step 1: Install Raspberry Pi OS
Begin by installing the latest version of Raspberry Pi OS on your device. You can download the OS from the official Raspberry Pi website and use a tool like Balena Etcher to flash it onto an SD card.
Step 2: Connect to the Internet
Ensure that your Raspberry Pi is connected to the internet via Wi-Fi or Ethernet. You can configure the network settings using the Raspberry Pi's desktop interface or the terminal.
Step 3: Create a RemoteIoT Account
Visit the RemoteIoT website and sign up for a free account. Once registered, log in to the platform and create a new device profile for your Raspberry Pi.
Step 4: Install RemoteIoT Client
Download and install the RemoteIoT client on your Raspberry Pi. Follow the instructions provided by RemoteIoT to complete the installation process.
Step 5: Configure the Client
Launch the RemoteIoT client and enter the credentials from your RemoteIoT account. The client will automatically establish a secure connection to the platform.
Step 6: Access Your Raspberry Pi
Once the connection is established, you can access your Raspberry Pi remotely through the RemoteIoT dashboard. Use the platform's interface to monitor and control your device.
Benefits of RemoteIoT for Raspberry Pi
Using RemoteIoT with your Raspberry Pi offers several benefits that enhance both functionality and security. Below are some of the key advantages:
- Secure Tunneling: RemoteIoT uses encrypted tunnels to ensure that your data remains protected during transmission.
- No Port Forwarding: The platform eliminates the need for port forwarding, simplifying the setup process and reducing security risks.
- Remote Monitoring: You can monitor the status of your Raspberry Pi in real-time, ensuring that it is functioning correctly.
- Scalability: RemoteIoT supports multiple devices, making it easy to expand your remote access solution as needed.
- User-Friendly Interface: The platform's intuitive dashboard makes it easy to manage your devices, even for beginners.
These benefits make RemoteIoT an excellent choice for anyone looking to enhance their Raspberry Pi's remote access capabilities.
Common Issues and Troubleshooting
While setting up RemoteIoT with a Raspberry Pi is generally straightforward, you may encounter some issues along the way. Below are some common problems and their solutions:
Issue 1: Connection Failures
If you are unable to establish a connection, ensure that your Raspberry Pi is connected to the internet and that the RemoteIoT client is properly configured. Check the platform's logs for any error messages.
Issue 2: Slow Performance
Slow performance may be caused by network latency or insufficient resources on your Raspberry Pi. Optimize your network settings and ensure that your device has adequate memory and processing power.
Issue 3: Security Concerns
To enhance security, use strong passwords and enable two-factor authentication on your RemoteIoT account. Regularly update your Raspberry Pi's software to patch any vulnerabilities.
Best Practices for Secure Remote Access
Implementing secure remote access is crucial to protecting your data and devices. Below are some best practices to follow when using RemoteIoT with your Raspberry Pi:
- Use Strong Passwords: Ensure that your RemoteIoT account and Raspberry Pi have strong, unique passwords.
- Enable Two-Factor Authentication: Add an extra layer of security by enabling two-factor authentication on your account.
- Keep Software Updated: Regularly update your Raspberry Pi's operating system and RemoteIoT client to ensure that you have the latest security patches.
- Monitor Device Activity: Use RemoteIoT's monitoring tools to keep an eye on your device's activity and detect any suspicious behavior.
- Limit Access: Restrict access to your Raspberry Pi to only those who need it, and use role-based permissions if available.
By following these best practices, you can ensure that your remote access solution remains secure and reliable.
Conclusion
In conclusion, RemoteIoT behind router Raspberry Pi free solutions offer a cost-effective and secure way to access your devices remotely. By leveraging the power of the Raspberry Pi and the simplicity of RemoteIoT, you can create a reliable remote access system that meets your needs. Whether you are managing IoT devices, running a home server, or working on a DIY project, this combination provides the flexibility and security you require.
We hope this guide has provided you with the knowledge and tools to set up and manage your remote access solution effectively. If you have any questions or need further assistance, feel free to leave a comment below. Additionally, don't forget to share this article with others who may find it useful,
Article Recommendations